The tips french nails began in 1976 when Jeff Pink, founder of ORLY, paired a bright pink base with a crisp white cap.
Today the silhouette stays refined while artists reinterpret the smile line with bold detail. Experts like Kim Truong, Tom Bachik, and Junita Huber-Millet praise mixes of tortoiseshell, chrome, and moody polka dots as fresh updates.
This guide gives practical tips and expert-backed steps to create a professional-looking manicure at home or in salon. You will find ways to choose a nude base, refine line work, and add playful motifs without losing elegance.
Expect clear technique, seasonal color stories, and accessible designs — from cream white tweaks to cat-eye sheen and tiny dots that lift the look.
Key Takeaways
- Origins: Jeff Pink and ORLY started the classic look in 1976.
- Modern edge: artists update the white cap with textures and color.
- Structure: stepwise guidance on base, shape, and smile line.
- Designs: from tortoiseshell to chrome and polka accents.
- Versatility: works across lengths and shapes with simple tone shifts.
Start with the Right Base: Nude Tones That Flatter
Choosing a complementary nude anchors the entire manicure. Kim Truong recommends Essie Mademoiselle for a sheer pink that flatters many skin tones. Tom Bachik favors Après Nails Forgotten Film for a cooler, neutral option.
Quick shade-match method:
- Test one thin coat on a single nail and view it in natural light.
- Check undertones—warm skins pair with peachy nudes; cool skins suit rose or taupe.
- Use one to two coats so the nude base stays breathable and light.
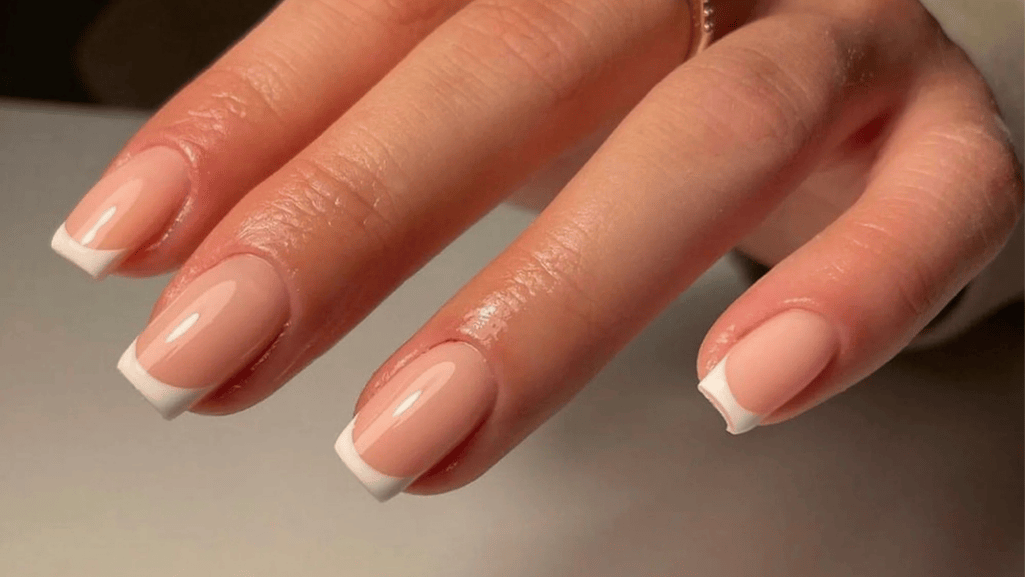
Apply base over tip for the soft “pink tint” effect
For a modern finish, paint the white tip first. Then float a very thin coat of your nude or pink polish across the tip and rest of the nail. This softens contrast and creates a natural, semi-ombré look while preserving the smile line.
Allow each layer to set so the white won’t streak when you layer. Use a flat brush dipped in remover to tidy the white edge before tinting if you need a sharp smile line.
Prep and longevity
Buff gently, care for cuticles, and apply a ridge-filling base coat to prevent sheer shades from showing flaws. Choose durable formulas—they keep the manicure pristine longer and reduce chipping.
Shape Matters: Why Almond and Tapered Tips Elevate the French
A tapered almond silhouette lengthens the finger and creates a graceful canvas for a neat white edge. This shape flatters most hands and gives more space for precise detailing without crowding the smile line.
“A slightly longer almond reads more luxurious and modern, giving room for intricate accents without crowding the smile line.”
Shaping guidance to achieve that refined profile:
- File the sides inward in small strokes and round the top to a soft point.
- Keep symmetry across fingers so the white edge sits evenly.
- Match length to design complexity: longer tips hold bolder work; moderate lengths aid daily comfort.
Pay attention to base alignment and apex placement to avoid a thick or uneven white edge. Practice the smile line on one nail after shaping to confirm the chosen silhouette supports your desired style and look.
Almond and tapered options move easily from minimalist to embellished finishes. Gentle filing between appointments preserves the refined outline that elevates even the simplest manicure.
Pro Techniques for the Perfect Line
A clean smile line is all about mapping the curve before you paint. Use a steady routine and simple tools to repeat the arc across every finger.
Guides and placement. Tom Bachik recommends placing french tip stickers just below the free edge to map a precise curve. Stick each guide so the arc matches the adjacent finger for a consistent smile line.
Brush control and product load. Use a fine detail brush and a minimal amount of polish to sketch the edge. Paint toward the sticker boundary, then nudge the wet polish with a clean-up brush for a refined line.
- Gel vs. regular: gel dries slower, letting an artist manipulate the line before cure; regular polish needs quicker, lighter strokes to avoid ridging.
- For short beds, follow Kim Truong and paint ultra-thin white micro lines to visually elongate the nail without adding length.
- Workflow: stick, paint, perfect with a brush, peel while pliable, then cure or let dry before topcoat.
“Practice on a swatch or one nail to calibrate pressure and angle, especially when switching formulas.”
Check symmetry by viewing at arm’s length and from multiple angles. If the edge reads harsh, seal with a thin base or sheer coat, then finish with topcoat to lock in shine.
Classic French Manicure, Refined
A clean, classic look endures because a crisp edge sits against a sheer base. That contrast reads polished and timeless.
Swap stark white for a rich cream to soften the silhouette. A creamy off-white keeps the recognizable outline but gives a warmer, more sophisticated finish.

Practical adjustments and small enhancements
Choose a slightly wider smile when using cream so the tip stays visible on medium and deeper skin tones. Pair the cream with a sheer pink or neutral base to avoid a yellow cast.
- Visibility: widen the arc modestly for balanced contrast.
- Detail: add a whisper-thin gold pinstripe above the cream for subtle luxe.
- Forgiveness: cream tips hide minor line flaws better than stark white, making DIY work easier.
Maintenance matters: refresh a thin topcoat midweek to keep shine and maintain the refined edge.
“A creamy tip updates the classic without losing its elegant style.”
Color-Forward French Tips
A color-forward approach swaps single white caps for coordinated hues that read polished and fresh. Modern variations use bright edges, mirrored finishes, and subtle color blocking to update the classic look.
Multi-color edges energize a set: paint each free edge a different shade and keep a uniform arc and width for cohesion. This maintains balance while offering a playful, cohesive design across the hand.
Butter yellow and mirrored chrome
Pair butter yellow tips with a mirrored chrome or iridescent base to catch light and add dimension. The chrome base reflects tones and makes the yellow pop without feeling loud.
Color blocking with taupe and chocolate
For a refined option, use a muted taupe base topped with a dark chocolate tip. The contrast is subtle, wearable, and gives depth for everyday sophistication.
- Select colors with similar saturation so the designs read intentional, not mismatched.
- Try pastels for spring brightness or jewel tones for evening polish while keeping tip width consistent.
- Workflow: paint the colored edge first, perfect the curve, then apply a sheer wash if you want a softened blend.
- Test a single accent color on two nails before committing to full multi-color—this helps calibrate the overall look.
Ombré and Fades for Modern Dimension
Shifting metallic pigment from the tip toward a bare bed creates a soft, dimensional finish that reads modern and wearable. This approach keeps the classic arc visible while adding light and movement.

Metallic ombré tips into a bare base
Concentrate a metallic color at the free edge, then blend inward to a sheer or nude base for an airy gradient.
Use a small makeup sponge to diffuse polish with gentle taps, then clean the perimeter and refine the arc with a thin brush so the ombré doesn’t muddy the line.
Semi-sheer pearly bases with crisp shapes
Apply a subtle pearly wash across the bed, let it set, and paint a distinct opaque cap to contrast glow and structure.
Add a single tiny gem at the center or side of the smile to punctuate the line without overpowering the minimalist design.
- Line control keeps the look identifiably French even as colors transition.
- Choose harmonious tones—champagne, rose gold, or soft bronze—for an elegant, work-friendly palette.
- Finish with a high-gloss topcoat to smooth textures and prevent metallic grit.
“A defined arc anchors the gradient, so practice the curve before blending.”
Animal Print French: Tortoiseshell and Cheetah Spots
A subtle animal motif on the free edge can read both modern and refined. Keep the rest of the bed sheer so the tip becomes the focal point.
Edged with fine gold detail for a luxe finish.
To build tortoiseshell tips, layer translucent amber and brown splotches. Work in thin glazes so the pattern feels deep, not flat.
Finish the arc with a thin gold outline. The fine metallic rim frames the tip and sharpens the design without adding bulk.
Cat-eye metallic base topped with cheetah spots.
Start with a magnetic cat-eye bronze to create a shifting light line. Then add varied cheetah spots in odd numbers and mixed sizes to mimic organic patterning rather than uniform polka motifs.
- Layer translucent amber and brown for tortoise depth.
- Add a very fine gold line to frame the tip.
- Use a cat-eye base, then place cheetah spots for motion.
- Keep the nail bed neutral so the print stays focal.
- Seal with a high-shine topcoat to amplify metallic and gold detail.
“Subtle animal print confined to the tip reads sophisticated and pairs easily with everyday looks.”
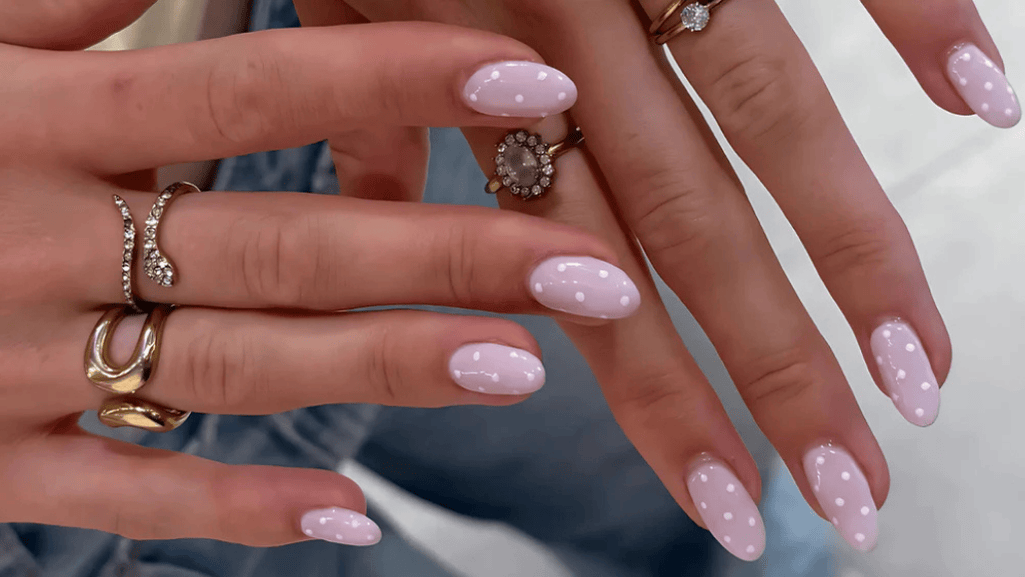
Polka Dots and Dotted Tips
A playful scatter of small marks can turn a classic arc into a lively, modern statement. Swapping the cap color and adding a light dusting of dots yields a look that feels both polished and unexpected.
Moody dot dusting over swapped-color tips
Dusting means lightly scattering tiny dots across the colored cap so texture appears without hiding the smile line. Use thin glazes and staggered placement so the pattern reads atmospheric, not crowded.
High-contrast white dots on black
White polka dots over black tips deliver crisp contrast and graphic appeal. Keep dot sizes consistent and anchor a row of circles along the arc for a neat, repeatable motif.
Kusama-inspired dotted white tips
For an artful option, repeat uniform dots across a white cap to echo Kusama’s rhythmic patterns. The effect feels minimal yet sculptural when spacing is measured and the bed remains sheer.
- Use a dotting tool or the end of a brush for even circles.
- Limit focus to two accent nails if you prefer restraint.
- Try seasonal swaps—deep brown with mint or taupe—before committing to full color.
- Seal thoroughly with a glossy topcoat to smooth raised dots and preserve shine.
“A subtle dot arrangement can modernize a french nail without stealing its timeless charm.”
tips french nails: Quick Wins You Can Try Today
One accent and a refined outline are enough to lift a manicure between appointments. Small, intentional edits save time and keep a set fresh during maintenance weeks.
Accent nail decor: tiny studs, gems, and decals
Place a single tiny stud at the base of one accent nail to add character without extra drying time. A minimalist gem or a tiny decal reads modern and takes seconds to apply.
Negative space and outlined edges
Negative space outlines trace the smile line and outer edge while leaving the interior clear. The result is architectural and crisp.
Use a fine brush to refine the line, then add one accent element and seal with a quick-dry topcoat for an instant update.
- Try a white outline on a sheer base for work-friendly polish.
- Or test a single colored or thin chrome edge to add subtle wow.
- These ways work well between salon visits and keep the set neat.
Texture and Shine: Cat-Eye, Chrome, and 3D Effects
Shimmer and texture can transform a classic arc into a statement that reads modern yet wearable.
Magnetic cat-eye French with jewel accents
Use a cat-eye polish and hold the magnet so the light-catching line aligns with the tip. This creates a dynamic shimmer that reinforces the smile curve and the visual line across the free edge.
Place a single silver jewel where the arc peaks to draw focus. The tiny jewels add quiet sparkle over a nude-pink base without overwhelming the overall design.

Chrome edges that pop against a bare base
Apply a fine chrome powder or metallic polish only along the tip. Let the bare bed amplify contrast and white or bright accents so the metallic edge really pops.
3D curved dents over pastel tips
Build minimal 3D “curved dents” on pastel caps for tactile interest. Keep forms shallow and small to avoid snagging and preserve wearability.
- Align the magnetic line at the tip for a strong shimmer curve.
- Add one jewel accent at the line’s peak for understated sparkle.
- Use chrome powder along the tip only to boost contrast and color.
- Keep 3D shapes minimal; finish with a smooth high-gloss topcoat to protect raised and metallic elements.
Seasonal Vibes: Fall-Ready French Designs
Autumn invites richer tones that make a classic manicure feel grounded and easy to wear. Warm taupes, chocolate, and tortoise hues bring depth and a wearable tone that pairs with layered fall outfits.
Color choices matter: choose muted chocolates and warm taupes as the primary palette. These colors read polished from day into evening and keep the set versatile.
Warm taupes, chocolate, and tortoise tones
Try tortoiseshell print on the free edge, then frame the arc with a fine gold line for a chic french tip. A neutral base keeps the look elevated and easy to pair with sweaters and coats.
Subtle Halloween nods: black marble, cat silhouettes, “vampire” reds
For a restrained nod to the season, marble the tip in inky black with whispering white veins or paint minimalist cat silhouettes with tiny metallic eyes.
Add one accent nail with deep red and a bright jewel for a tasteful “vampire” accent. Mixing a single festive nail into a neutral set gives a bit of flair without committing to a full themed manicure.
- Palette: taupe, chocolate, tortoise for everyday autumn depth.
- Print: tortoiseshell edged in gold for refined trend relevance.
- Halloween: black marble, metallic-eyed cats, or jeweled red as subtle options.
Playful Prints and Micro Motifs
Small, graphic motifs refresh a classic manicure without overpowering its clean architecture. Keep the bed neutral and let micro art sit on or just above the white arc so the structure stays visible.
Micro cherries and tiny daisies on a classic base
Place one or two tiny cherries or daisies near the free edge. These elements read personalized and sweet without crowding the design.
Pucci-inspired swirls for bold tips
Concentrate Pucci-like swirls on the free edge for a statement that respects the framework. Use two to three complementary colors and a steady hand to keep the print crisp.
Head-in-the-clouds pastels with airy details
Soft pastel clouds on an accent nail lighten the set and add whimsy. Limit motifs to one or two nails so the overall look stays refined.
- Scale matters: keep motifs micro so they enhance, not obscure, the arc.
- Coordinate colors across motifs and tips for a cohesive, polished result.
- Apply a thin topcoat to seal tiny details and preserve shine.
Minimalist Moments: Micro French and Fine Gold
Micro lines can slim the silhouette and give a set a quietly modern edge. These ultra-thin accents read intentional and work well on shorter beds.
Keep the bed sheer so the fine white shows as crisp architecture rather than a heavy block of color. This pairing moves easily from day to evening without looking fussy.
Ultra-thin white lines for sleek, modern style
Paint the thinnest possible white band at the free edge to create a sleek silhouette. Use a steady hand and a fine brush for consistent curvature and even line thickness.
On short nails, a micro white line visually extends the bed. Keep strokes light and confident; avoid overloading the brush to prevent blobs.
Gold detailing that softly hugs the free edge
A soft gold hug along the edge reads like jewelry. Apply a very fine metallic stroke just above or below the white for a refined, luxe finish.
Mix micro white on most fingers with one or two gold-edged accents to keep the set restrained yet elevated.
- Execution: map the arc, then draw a single, thin white line.
- Base: pair ultra-fine white with a sheer nude or pink for crisp contrast.
- Tool: use a 000 or 00 brush and minimal product for control.
- Accent strategy: alternate white and gold edges for a balanced, jewelry-like manicure.
“A precise, micro arc reads modern and tiny—less is often more.”
Press-On Power: Chic French in Minutes
Quick-apply press-on kits make a crisp manicure achievable in minutes. They bridge polish-level polish and instant convenience for busy schedules or last‑minute plans.

KISS French and nude collections for rapid transformations
KISS offers classic and modern sets that snap on in moments. Choose from timeless white caps or soft nude bases to get an instant, professional look without salon time.
Glam bling accents and seasonal options
Collections include glam bling for events and Halloween-themed styles when you want bolder design without long wear-time. They suit a range of outfits and occasions.
- Time-saving: a fast path to crisp french tips with no drying time.
- Versatile: classic and modern sets that read like a salon finish.
- Durable: wear up to a week with proper prep and glue.
- Statement-ready: pick a bling or themed set for a standout look.
- Quick-fit steps: size each nail, wipe with alcohol, apply glue sparingly, then press from base to tip for best adhesion.
For curated stick-on options and fit guidance, see our roundup of the best stick-on French options.
Pro tip: finish with a thin top coat to extend shine and secure edges. This section’s content highlights quick styling choices and practical fit steps for a neat nail result that rivals a traditional french manicure.
Expert-Endorsed Ways to Keep It Fresh
Simple maintenance and a single bold twist preserve charm while updating the set. Experts agree the look stays relevant because it adapts easily. Small changes refresh the whole hand without a full redo.
Refresh strategy: why the look never goes out of style
Schedule minor upkeep every 7–10 days. Reshape the tip, tidy cuticles, and refine the smile line to prolong wear. Swap a single accent or switch finishes mid-cycle to keep the set current.
Think outside the box: mirrored outer-corner lines
A bold, modern alternative is mirrored diagonal lines at both outer corners. This reframes the tip and adds crisp symmetry.
- Adaptability: small edits maintain identity while embracing trend-forward detail.
- Execution: use a 000 brush and steady pressure to map each diagonal cleanly.
- Rotation: alternate glossy, matte, or chrome finishes to refresh the same silhouette.
“A simple diagonal shift can make a classic set feel entirely new.”
Conclusion
A clear roadmap helps you get consistent results: select a flattering base, shape with intention, perfect the line, and personalize with seasonal color, texture, or micro detail.
Expert takeaways: use sticker guides for repeatable arcs, choose gel when you need extra working time, and favor micro edges to visually lengthen the nail.
Experiment within the classic framework—try ombré fades, chrome edges, animal prints, or playful dots—while keeping the white or colored arc as the defining element.
For quick updates, use tiny accents, negative-space outlines, or press-on sets to refresh a set without a full appointment. Choose one new way to update your next set and build confidence by layering techniques over time for polished results.
FAQ
What base color should I use to get a flattering nude look?
How do I achieve the soft “pink tint” effect over the free edge?
Which nail shape makes a classic manicure look more elegant?
What tools help create a precise curved line?
When should I choose gel polish over regular polish for line work?
How can micro lines make short nail beds look longer?
Is there a softer alternative to stark white for the classic look?
What color combos work well for playful multi-color tips?
How do you create a metallic ombré into a bare base?
What’s the best way to add animal print without overwhelming the manicure?
How do I do high-contrast dotted tips that pop?
What simple accents can elevate a home manicure instantly?
Which finishes give the most modern texture and shine?
How do I adapt designs for fall colors?
Are press-on sets a good option for quick transformations?
What maintenance tips keep the look fresh longer?