Unlock the secret to captivating glamorous eyes with expert eye makeup tips. Eyeshadow can dramatically enhance your natural beauty, making your eyes the centerpiece of your overall look.
Drawing inspiration from top beauty sources like “Amazing Adornments” and “Fab Mood,” this article will guide you through the world of beautiful eyeshadow techniques. You’ll discover how to create stunning looks that elevate your everyday style or make a statement for special occasions.
Key Takeaways
- Expert tips for applying eyeshadow like a pro
- Step-by-step guides to creating glamorous eye looks
- Insights into the latest eye makeup trends
- Advice on choosing the right eyeshadow colors for your skin tone
- Techniques for making your eyes look bigger and more vibrant
Essential Tools and Products for Stunning Eye Makeup
The key to beautiful eyeshadow looks lies in the tools and products you use. To achieve stunning eye makeup, it’s crucial to have the right arsenal of products and tools.
Quality Eyeshadow Palettes Worth Investing In
A good eyeshadow palette is the foundation of any eye makeup look. Consider investing in a palette that offers a range of shades, like the NARCISSE Eye Shadow Palette, recommended for its smooth, natural base. Quality palettes ensure a seamless application and a more polished finish.
Brushes and Applicators for Precise Application
The right brushes and applicators are vital for precise application. Different brushes serve different purposes, from blending to detailed work. Investing in a variety of brushes can significantly enhance your eye makeup techniques.
Primers and Setting Sprays for Long-Lasting Wear
To ensure your eye makeup lasts all day, use a primer to prepare your eyelids and a setting spray to lock your look in place. These products are essential for long-lasting wear and preventing creasing.
Preparing Your Canvas: Eye Prep Techniques
The key to beautiful eyeshadow lies in the preparation of your eyelids. Proper eye prep techniques ensure that your eyeshadow looks vibrant, lasts longer, and applies smoothly.
Proper Cleansing and Moisturizing
Before applying eyeshadow, it’s essential to cleanse and moisturize your eyelids. Start by gently removing any dirt or makeup residue with a mild cleanser. Then, apply a lightweight eye cream to hydrate the delicate skin around your eyes. This step helps create a smooth canvas for your eyeshadow.
Priming Your Eyelids for Maximum Color Payoff
Priming your eyelids is a crucial step for achieving maximum color payoff. Apply an eyeshadow primer to your eyelids, making sure to cover the entire area. This helps the eyeshadow adhere evenly and brings out the pigment of the shadows. For an added boost, consider using a primer with a color-correcting formula.
Color Correcting for Different Skin Tones
Color correcting can help neutralize any discoloration on your eyelids, creating a more even base for your eyeshadow. For instance, if you have a cool skin tone, use a peach-colored corrector to counteract any sallowness. If you have a warm skin tone, a purple-based corrector can help reduce the appearance of dark circles. Choose a corrector that complements your skin tone to achieve a flawless base.

Basic Eyeshadow Application Techniques
Mastering eyeshadow application is an art that can elevate your makeup game. With the right techniques, you can achieve a variety of looks, from subtle to dramatic. The key lies in understanding the basics and practicing them.
The Classic Three-Shadow Method
The classic three-shadow method involves applying three different shades of eyeshadow to create depth and dimension. Start with a light shade all over your lid, a medium shade in the crease, and a dark shade along the lash line. This technique is great for beginners and can be customized for different occasions.
Blending Techniques for Seamless Transitions
Blending is crucial for a seamless eyeshadow look. Use a fluffy brush to gently blend the edges of the eyeshadows, creating a smooth transition between shades. Start with light strokes and gradually increase the pressure for a more blended look.

Building Intensity: From Subtle to Dramatic
To build intensity, start with a light layer of eyeshadow and gradually add more product. For a subtle look, apply a single shade all over the lid. For a more dramatic look, layer multiple shades and add a shimmery shade to the center of the lid. Remember, blending is key to avoiding harsh lines.
By mastering these basic eyeshadow application techniques, you can create a variety of looks to suit any occasion. Whether you’re going for a natural everyday look or a glamorous evening look, the right techniques will help you achieve your desired outcome.
Beautiful Eyeshadow Looks for Different Occasions
When it comes to eyeshadow, the right look can elevate your entire appearance, making you stand out at any event. Whether you’re heading to work, a night out, or a special occasion, there’s an eyeshadow look that’s perfect for you.

Soft Neutral Glam for Everyday Wear
A soft, neutral glam look is ideal for everyday wear. It involves using shades of beige, champagne, and soft brown to create a natural, effortless look. This style is perfect for work or a casual day out.
Key steps: Apply a light beige shade all over your lid, a soft brown in the crease, and a shimmery champagne on the inner corner.
Bronze Goddess Look for Office Sophistication
For a sophisticated office look, try the bronze goddess eyeshadow style. This involves using bronze and copper shades to add warmth to your eyes. It’s a great way to look polished and professional.
- Apply a bronze shade on the lid
- Use a copper shade in the crease
- Highlight with a shimmery gold on the inner corner
Smoky Eye Variations for Evening Glamour
The smoky eye is a classic look for evening glamour. You can customize it with different shades to suit your style. For a dramatic look, use deep grays and blacks, or for a softer version, try using browns and taupes.
Tip: Blend, blend, blend! A well-blended smoky eye is key to a sophisticated look.
Cut Crease Technique for Special Events
The cut crease technique is perfect for special events. It involves creating a sharp, defined line in the crease of your eye, which can make your eyes look larger and more dramatic.
- Apply a primer to your eyelids
- Use a concealer to create a sharp line in the crease
- Apply eyeshadow above and below the line
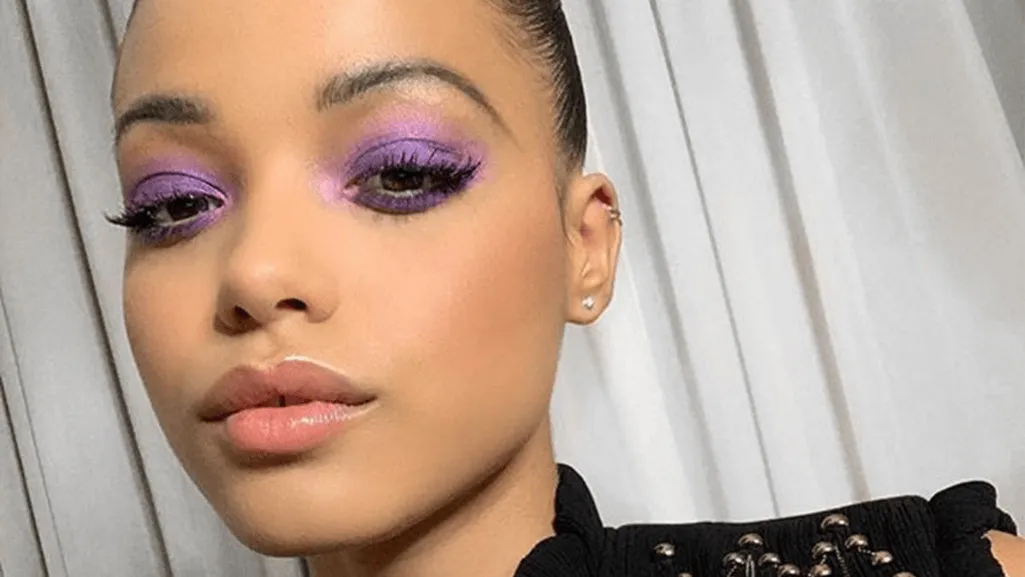
Colorful Halo Eyes for Bold Statements
For a bold statement, try the colorful halo eye look. This involves applying a bright, shimmery shade all over the lid, surrounded by a darker shade in the crease.
Example: Use a bright blue or green on the lid and a dark gray or black in the crease for a striking contrast.
With these eyeshadow looks, you’ll be ready to take on any occasion in style. Whether you’re going for a natural everyday look or a bold statement for a special event, there’s an eyeshadow style to match your mood and event.
Customizing Eyeshadow Techniques for Your Eye Shape
Understanding your eye shape is crucial for applying eyeshadow techniques that enhance your natural beauty. Different eye shapes have unique characteristics that can be accentuated with the right makeup strategies. By tailoring your eyeshadow application to your eye shape, you can achieve a more balanced and striking look.

Enhancing Almond Eyes
Almond eyes are considered the ideal canvas for eyeshadow application due to their balanced proportions. To enhance almond eyes, focus on creating depth by applying a light shade all over the lid, a medium shade in the crease, and a dark shade along the lash line. This technique adds dimension without altering the natural shape.
Opening Up Hooded Eyes
Hooded eyes benefit from techniques that create the illusion of more space. Apply a light eyeshadow shade on the lid and up to the brow bone to open up the area. Use a medium shade in the crease to add depth, and avoid heavy application on the lid to prevent the eyes from appearing smaller.
Balancing Round Eyes
Round eyes are characterized by their curved shape, which can be balanced by creating angles. Apply a darker shade on the outer corner and crease to elongate the eye, while using a lighter shade on the inner corner to brighten the area. This technique helps to create a more almond-like shape.
Widening Close-Set Eyes
For close-set eyes, the goal is to create the illusion of more space between them. Apply a light shade on the inner corner of the eyes to make them appear farther apart. Avoid heavy application on the inner lid, as this can make the eyes appear closer together.
Defining Monolid Eyes
Monolid eyes lack a visible crease, making it essential to use different techniques to define the eye shape. Apply a medium to dark shade on the lid to create depth, and use a light shade on the brow bone to highlight. This helps to create the illusion of a crease and adds dimension to the eyes.
By understanding your eye shape and applying the right eyeshadow techniques, you can customize your look to enhance your natural features. Experiment with different shades and techniques to find what works best for you, and don’t be afraid to seek inspiration from makeup tutorials tailored to your eye shape.
Working with Different Eyeshadow Formulations
Understanding the nuances of eyeshadow formulations is key to achieving flawless eye makeup. Different types of eyeshadows offer unique benefits and challenges, and mastering their application techniques can elevate your makeup game.
Eyeshadow formulations have evolved significantly, offering a range of textures and finishes. From powder to cream, and liquid to glitter eyeshadows, each formulation requires specific techniques for optimal results.
Powder Eyeshadows: Classic Application Methods
Powder eyeshadows are a staple in many makeup routines. To apply them effectively, use a fluffy brush to sweep the eyeshadow across your lid. Start with a light hand and build up the color gradually. Blending is key to achieving a seamless look. Use a clean brush to soften any harsh lines and blend the edges.

Cream Eyeshadows: Techniques for Smooth Application
Cream eyeshadows offer a creamy texture that can be applied with fingers or a brush. To apply, dot the product onto your lid and blend outwards using gentle, sweeping motions. Warm the product between your fingers before application to enhance blendability.
Liquid and Glitter Eyeshadows: Precision Tips
Liquid and glitter eyeshadows require precision and patience. Use a small applicator to apply the product directly to your lid, and allow it to dry before applying additional layers. For glitter eyeshadows, apply a glitter primer to enhance adhesion and longevity.
By mastering the techniques for different eyeshadow formulations, you can unlock a world of creative possibilities and achieve stunning eye makeup looks.
Conclusion: Embracing Your Unique Beauty
As you’ve explored the various eyeshadow techniques and looks, remember that the key to stunning eyes is not just about following trends, but about embracing your unique beauty. Every eye shape, skin tone, and personal style is different, and what works for one person may not work for another.
By understanding your eye shape and experimenting with different eyeshadow techniques, you can enhance your natural features and create a look that’s truly yours. Whether you’re going for a soft, natural look or a bold, dramatic statement, the most important thing is to have fun and be confident in your own skin.
Embracing individuality is all about celebrating what makes you different. So, don’t be afraid to try new things and make mistakes – it’s all part of the process of discovering what works best for you. With practice and patience, you’ll be able to create beautiful eyeshadow looks that make you feel like the best version of yourself.
FAQ
What are the essential tools needed for stunning eye makeup?
How do I choose the right eyeshadow palette for my needs?
What’s the importance of priming my eyelids before applying eyeshadow?
How can I make my eyeshadow look more dramatic?
What’s the best way to apply eyeshadow for different eye shapes?
How do I work with different eyeshadow formulations?
Can I use the same eyeshadow look for different occasions?
How can I make my eyeshadow last longer?
What’s the best way to blend eyeshadow for a seamless transition?